


Inside the Kubernetes Scheduler: A Deep Dive into Pod Scheduling Logic
Understanding How the Kubernetes Scheduler Makes Intelligent Pod Placement Decisions

Kubernetes has revolutionized container orchestration by automating deployment, scaling, and management of containerized applications. At the heart of this orchestration lies one of Kubernetes' most critical components: the scheduler. This article provides an in-depth exploration of the Kubernetes scheduling process, revealing how the scheduler makes sophisticated decisions to place pods across your cluster.
The Critical Role of the Scheduler
The Kubernetes scheduler is responsible for determining which node should run each pod in your cluster. This seemingly simple task becomes increasingly complex in large-scale deployments with varying application requirements, resource constraints, and organizational policies.
The scheduler must balance multiple, often competing objectives:
Ensuring efficient resource utilization across the cluster
Respecting application constraints and affinities
Maintaining high availability through proper pod distribution
Adhering to organizational policies and security requirements
Let's examine how the scheduler accomplishes this through its sophisticated decision-making pipeline.
The Scheduling Pipeline: From Creation to Execution
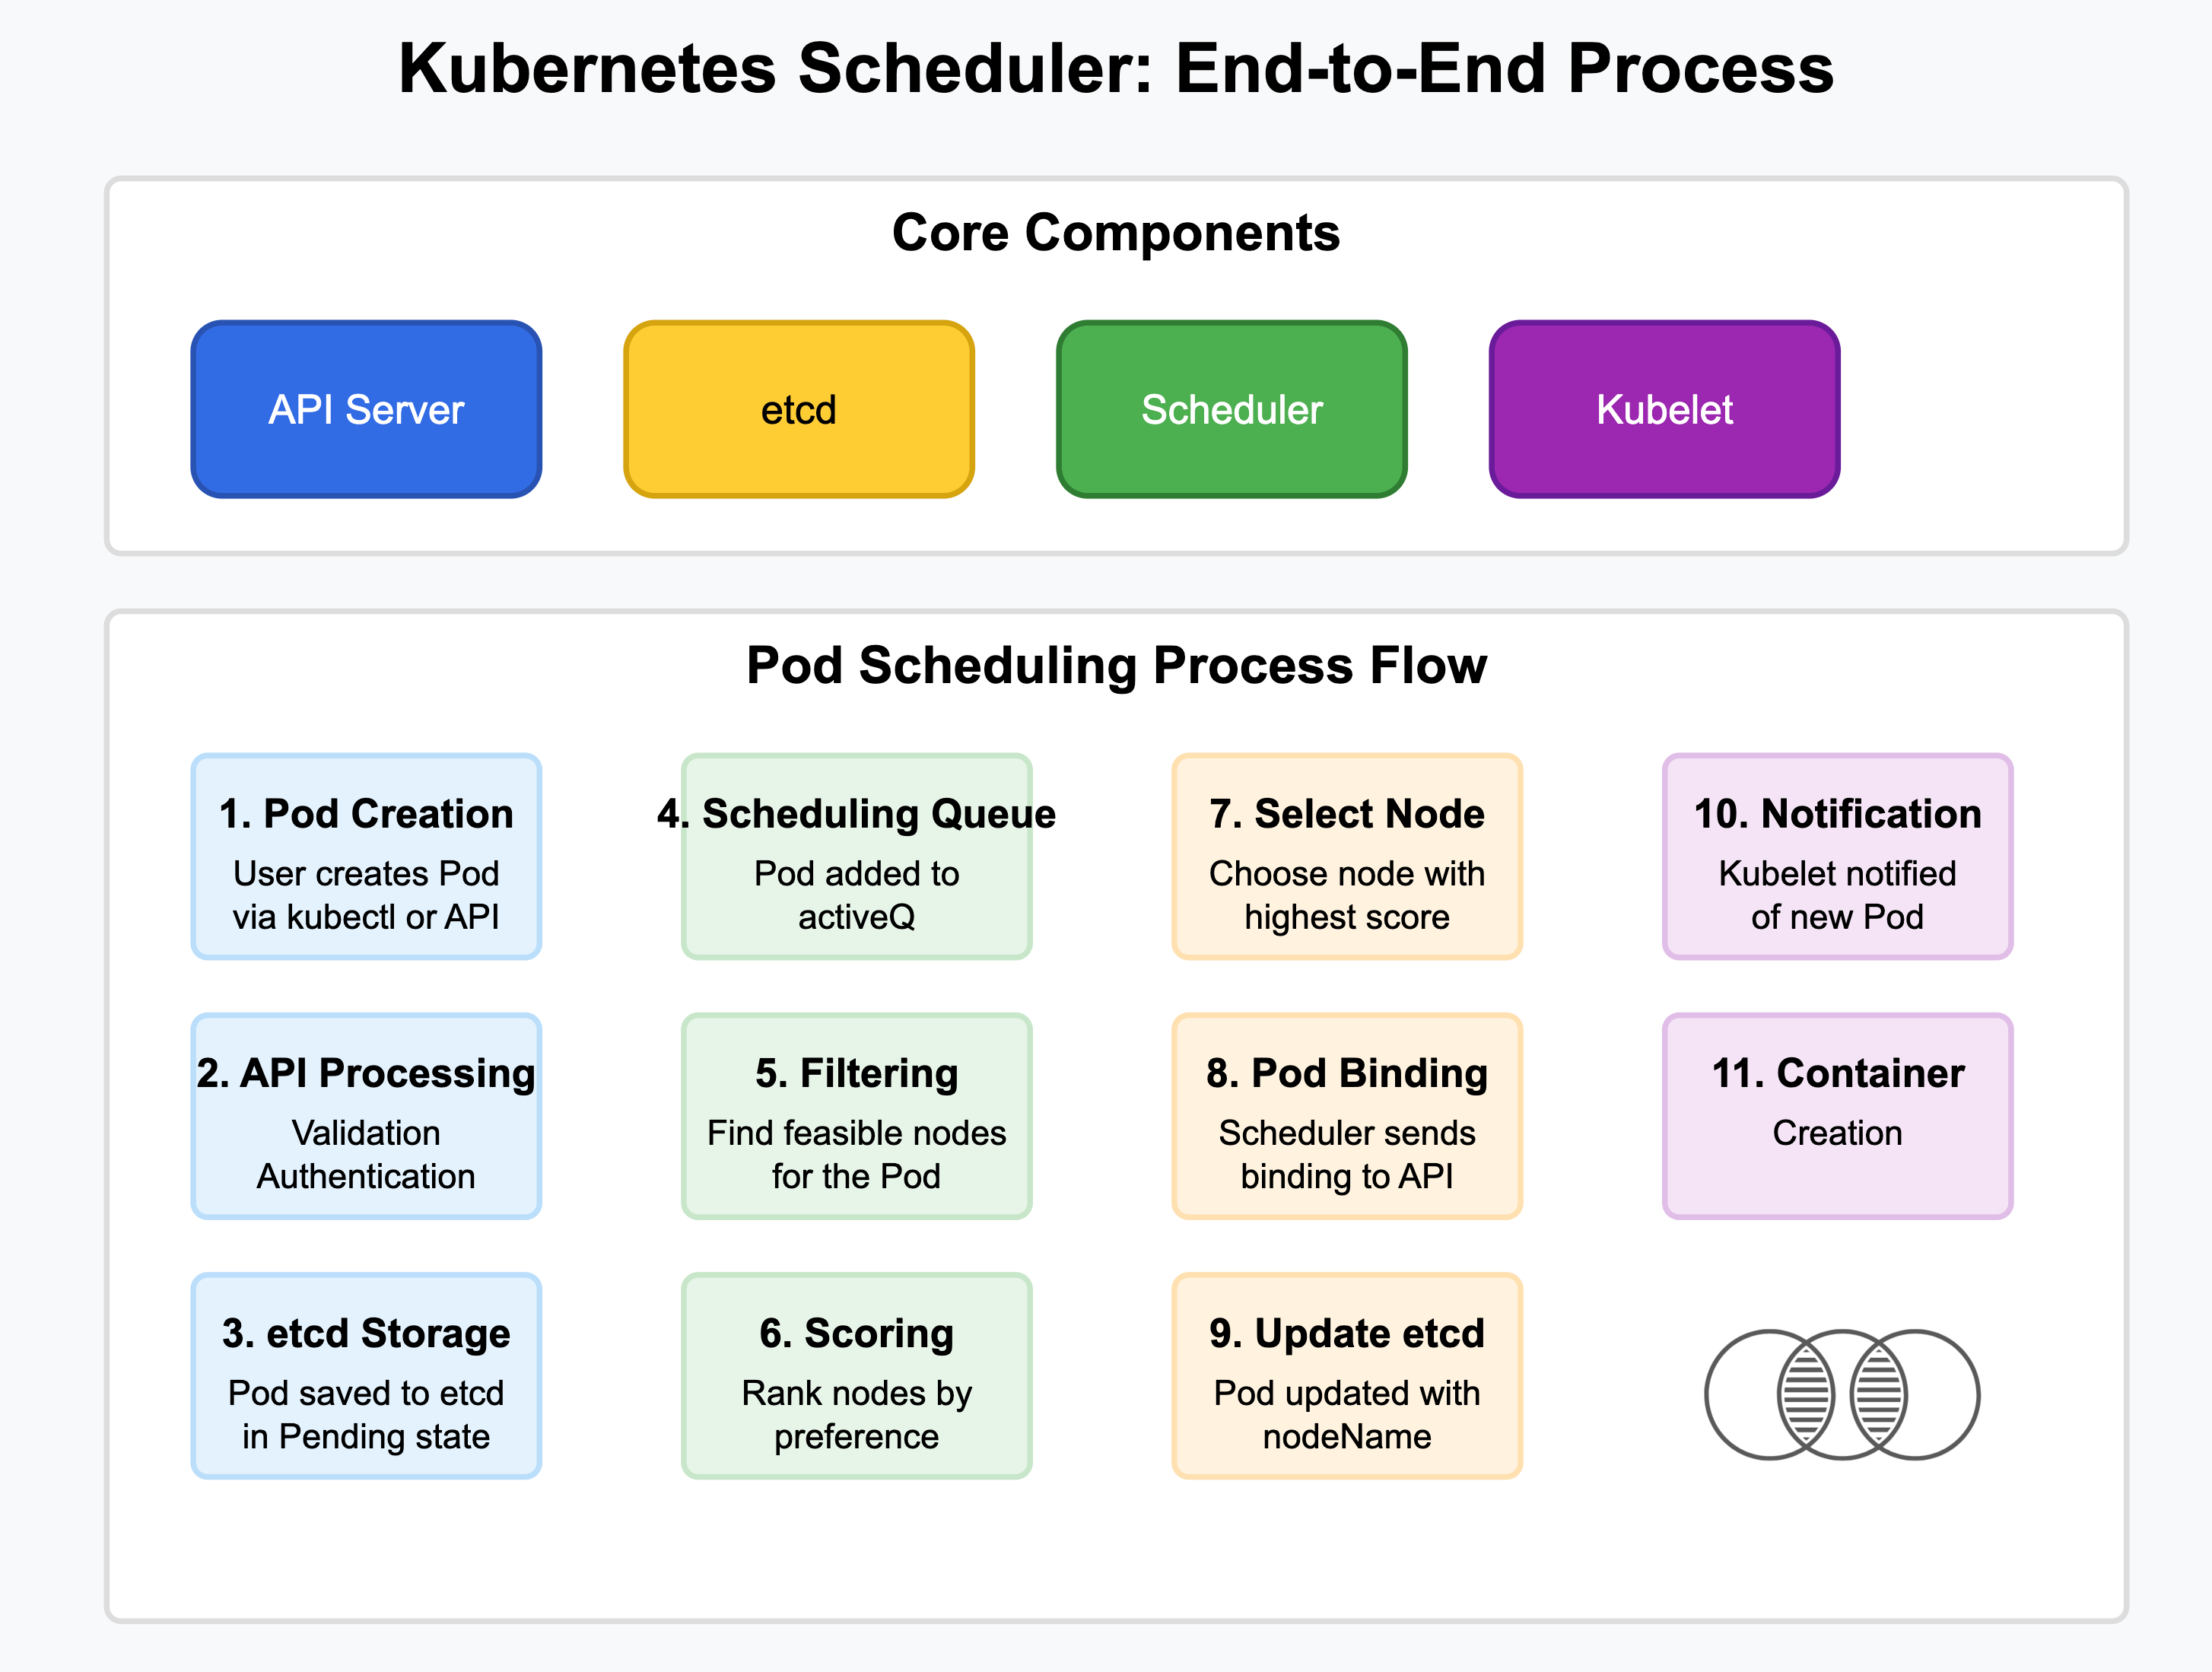
1. Pod Creation and API Server Processing
When a pod is created, the process begins with the API server:
A user or controller (such as a Deployment controller) submits a pod creation request
The API server validates the request against the schema
Authentication and authorization mechanisms verify the requester has appropriate permissions
Admission controllers process and potentially modify the pod specification
The API server persists the pod object to etcd with
spec.nodeNameemptyThe pod enters the
Pendingstate, awaiting scheduling
2. The Scheduling Queue
The scheduler maintains a sophisticated queuing system that manages pods awaiting scheduling decisions:
Queue Structure
The scheduling queue consists of two primary sub-queues:
activeQ: Contains pods that are ready for scheduling
backoffQ: Contains pods that previously failed scheduling and are waiting before retry
Pods in the backoffQ are moved to the activeQ once their backoff period expires.
Queue Prioritization
Within each queue, pods are prioritized based on:
Pod Priority: Defined by
PriorityClass, allowing critical workloads to be scheduled firstQueue Timestamp: When the pod entered the queue, implementing a fair scheduling approach
This prioritization ensures critical workloads receive resources first while preventing starvation of lower-priority pods.
3. The Scheduling Cycle
For each scheduling cycle, the scheduler:
Selects the highest-priority pod from the activeQ
Attempts to find a suitable node through the filtering and scoring process
Binds the pod to the selected node
Moves to the next pod in the queue
Let's examine each phase of finding a suitable node in detail.
The Node Selection Process
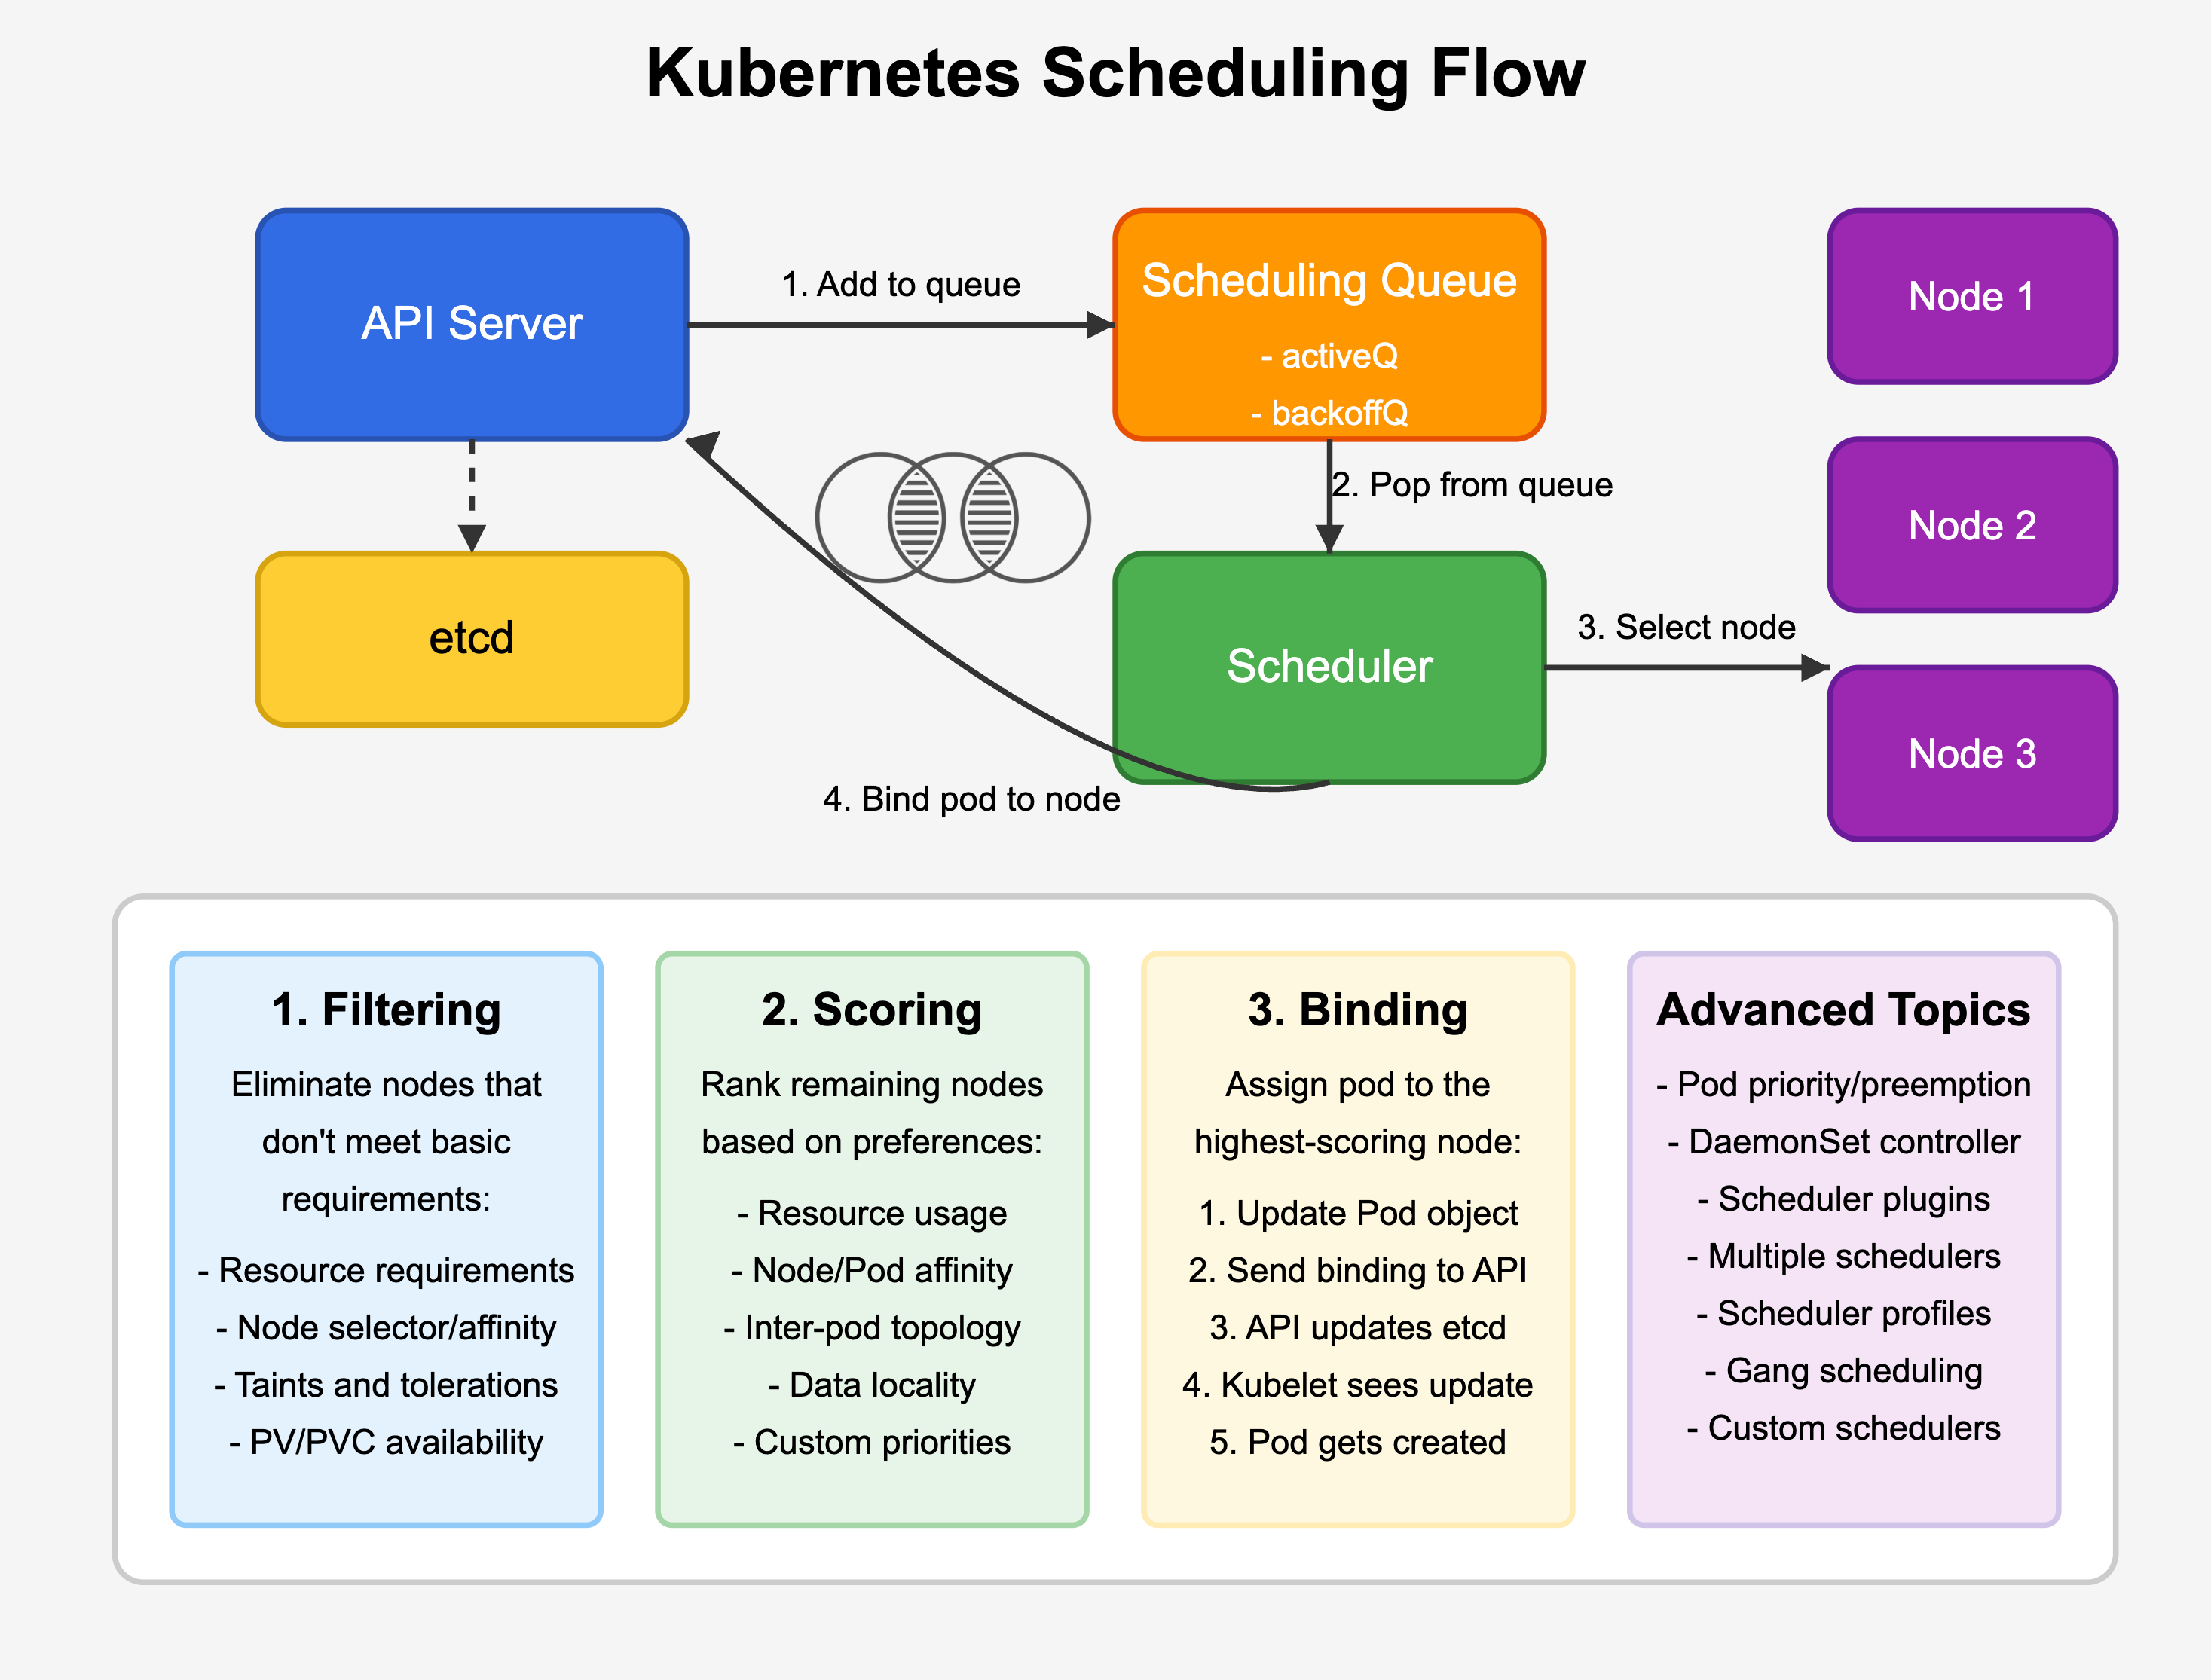
Phase 1: Filtering (Predicates)
The filtering phase eliminates nodes that cannot run the pod based on hard constraints. This phase is binary - a node either passes all filters or is eliminated from consideration.
Key filtering plugins include:
NodeResourcesFit
Ensures the node has sufficient resources (CPU, memory, ephemeral storage, etc.) to accommodate the pod.
resources:
  limits:
    cpu: 500m
    memory: 512Mi
  requests:
    cpu: 250m
    memory: 256Mi
NodeName
Checks if the pod specifies a nodeName directly:
spec:
  nodeName: worker-node-03
NodeSelector
Filters nodes based on label matching:
spec:
  nodeSelector:
    zone: us-east-1a
    disk-type: ssd
NodeAffinity
Provides more sophisticated node selection rules:
spec:
  affinity:
    nodeAffinity:
      requiredDuringSchedulingIgnoredDuringExecution:
        nodeSelectorTerms:
        - matchExpressions:
          - key: kubernetes.io/e2e-az-name
            operator: In
            values:
            - e2e-az1
            - e2e-az2
PodAffinity/PodAntiAffinity
Filters nodes based on which other pods are running on them:
spec:
  affinity:
    podAntiAffinity:
      requiredDuringSchedulingIgnoredDuringExecution:
      - topologyKey: kubernetes.io/hostname
        labelSelector:
          matchExpressions:
          - key: app
            operator: In
            values:
            - web-server
TaintToleration
Checks if the pod can tolerate any taints on the node:
spec:
  tolerations:
  - key: "node-role.kubernetes.io/master"
    operator: "Exists"
    effect: "NoSchedule"
VolumeRestrictions
Verifies that any volumes the pod requires are available on the node:
spec:
  volumes:
  - name: data
    persistentVolumeClaim:
      claimName: database-data
Phase 2: Scoring (Priorities)
After filtering, the remaining nodes are scored based on a series of priority functions. The node with the highest cumulative score is selected for the pod.
Key scoring plugins include:
NodeResourcesBalancedAllocation
Balances resource utilization across nodes, preferring nodes with balanced CPU and memory utilization.
ImageLocality
Prefers nodes that already have the pod's container images cached locally to reduce startup time.
InterPodAffinity
Scores nodes based on pod affinity/anti-affinity preferences:
spec:
  affinity:
    podAffinity:
      preferredDuringSchedulingIgnoredDuringExecution:
      - weight: 100
        podAffinityTerm:
          topologyKey: kubernetes.io/hostname
          labelSelector:
            matchLabels:
              app: cache
NodePreferAvoidPods
Uses node annotations to indicate preference for avoiding additional pods:
kind: Node
metadata:
  annotations:
    scheduler.alpha.kubernetes.io/preferAvoidPods: '{"preferAvoidPods": [{"podSignature": {"podController": {"kind": "ReplicationController", "name": "foo"}}}]}'
NodeAffinity (preferred)
Scores nodes based on preferred node affinity:
spec:
  affinity:
    nodeAffinity:
      preferredDuringSchedulingIgnoredDuringExecution:
      - weight: 1
        preference:
          matchExpressions:
          - key: kubernetes.io/e2e-az-name
            operator: In
            values:
            - e2e-az1
            - e2e-az2
TaintToleration
Preferring nodes with fewer taints not tolerated by the pod.
Each scoring plugin produces a score between 0-100 for each node. These scores are multiplied by the plugin's weight and then summed to produce a final score.
Phase 3: Binding
Once the highest-scoring node is selected:
The scheduler updates the pod object with the selected node name
The scheduler sends a binding API request to the API server
The API server updates the pod in etcd with the node assignment
The kubelet on the selected node is notified of the new pod
The kubelet pulls the necessary container images and starts the pod's containers
Handling Scheduling Failures
If the scheduler cannot find any suitable node for a pod during the filtering phase, the scheduling fails, and the pod remains in the Pending state. The scheduler will:
Record an event explaining the failure reason
Apply a backoff period to the pod
Place the pod in the backoffQ for later retries
Common scheduling failure reasons include:
Insufficient resources: "Insufficient memory", "Insufficient CPU"
Node selector mismatch: "No nodes matched node selector"
Taint restrictions: "No nodes are available that match all of the following predicates"
Advanced Scheduling Capabilities
Pod Priority and Preemption
Kubernetes allows assigning priorities to pods using PriorityClass:
apiVersion: scheduling.k8s.io/v1
kind: PriorityClass
metadata:
  name: high-priority
value: 1000000
globalDefault: false
description: "This priority class should be used for critical service pods only."
When resources are constrained, higher-priority pods can preempt (evict) lower-priority pods to ensure critical workloads get the resources they need.
Scheduler Plugins and Extensibility
The Kubernetes scheduler is highly extensible through its plugin architecture. Organizations can develop custom plugins to implement specialized scheduling logic for their unique requirements:
Filter plugins: Implement custom node filtering logic
Score plugins: Provide custom node scoring algorithms
Bind plugins: Customize the pod binding process
Multiple Schedulers
Kubernetes supports running multiple schedulers simultaneously, each responsible for different types of workloads:
apiVersion: v1
kind: Pod
metadata:
  name: custom-scheduled-pod
spec:
  schedulerName: my-custom-scheduler
  containers:
  - name: container
    image: nginx
Scheduler Profiles
Scheduler profiles allow configuring different scheduling pipelines for different workloads within a single scheduler:
apiVersion: kubescheduler.config.k8s.io/v1
kind: KubeSchedulerConfiguration
profiles:
- schedulerName: default-scheduler
  plugins:
    score:
      disabled:
      - name: NodeResourcesBalancedAllocation
- schedulerName: balanced-workload-scheduler
  plugins:
    score:
      enabled:
      - name: NodeResourcesBalancedAllocation
        weight: 3
Performance Considerations and Best Practices
Optimizing Scheduler Performance
For large clusters, scheduler performance becomes critical. Best practices include:
Appropriate resource requests/limits: Specifying accurate resource requirements helps the scheduler make better decisions
Node labels and taints: Using a consistent labeling strategy simplifies pod placement rules
Avoiding complex scheduling constraints: Highly complex affinity/anti-affinity rules can severely impact scheduling performance
Debugging Scheduling Issues
When troubleshooting scheduling problems:
Check pod events:
kubectl describe pod <pod-name>Examine scheduler logs:
kubectl logs -n kube-system <scheduler-pod-name>Use
kubectl get eventsto see cluster-wide scheduling eventsConsider using
kubectl alpha debugfor more detailed debugging
Conclusion
The Kubernetes scheduler is a sophisticated component that intelligently places pods across your cluster based on resource requirements, constraints, and preferences. Understanding its inner workings can help you design more efficient and resilient deployments.
By leveraging features like node affinity, pod priority, and scheduler extensibility, you can tailor the scheduling behavior to your specific requirements, ensuring optimal resource utilization and application performance.
As Kubernetes continues to evolve, the scheduler is receiving more capabilities to handle complex workloads and constraints, making it an increasingly powerful tool in the container orchestration landscape.
To go beyond Kubernetes Certifications and start building Real world skills, get started with our Kubernetes Mastery Track/Minidegree.